Friday, 1 October 2021

General PC Tips


  • Adjust any setting on your PC with the Windows “God Mode” folder, which is a centralized Control Panel for all the OS settings. Access this by creating a new folder named: God Mode.{ED7BA470-8E54-465E-825C-99712043E01C}.
  • Backup beyond a local file with services like Google Drive, DropBox, or other reputable cloud storage solutions, as extra security.
  • Problem Step Recorder will record all mouse clicks and take screenshots. This tool is helpful to a tech when an issue with your PC needs to be diagnosed. Use this by pressing Windows + R then type the letters “psr”.

Efficiency and Space Saving Tricks

 Have better luck with your PC running smoother with these tips:

  • When your PC takes a long time to boot up, you may have too many programs running when you get started. To eliminate unnecessary programs, press Windows key + R, then type “misconfig”. Select the Startup tab from the window that pops up, and you will be able to turn off any programs you want that are slowing your boot time.
  • Delete large space-wasting files with WinDirStat, which is short for “Windows Directory Statistics”. It shows you which files are taking up the most space, and you can then delete them accordingly.

Tricks on the Keyboard


  • Close all your windows quickly if you’re in a hurry by pushing the Windows button +D, and they will all shut immediately.
  • Rename your highlighted files quickly by pressing F2.
  • Close the program running with ALT + F4.
  • To minimize all windows only, press Windows + D.
  • Re-open your last closed tab with Shift + CTRL + T on most browsers.
  • Instead of moving the cursor to the X in the corner, press CTRL + W to close the current window.
  • Take a screen shot with ALT + Print Screen.

Tricks for Typing

 Here are a few tips that will save you lots of time when typing documents:

  • Move the cursor quicker to the beginning of the previous word by pressing CTRL+Left Arrow, instead of doing it manually.
  • To get the cursor to the beginning of the next word, use CTRL+Right Arrow.
  • Recover a deleted item with ALT+Backspace.
  • Delete an entire word by pressing CTRL+Backspace.
  • Select a word you want to highlight quickly, without dragging the mouse, by double-clicking on it.
  • Highlight a whole paragraph by triple-clicking on it.
  • Make superscript and sub text by pressing CTRL + = for sub, and CTRL+ Shift for superscript.
  • Paste in plain text and not what was originally formatted, after copying, by pressing CTRL + Shift + V.

Sunday, 1 November 2020

How to Use Keyboard as a Mouse

 Working on the operating system with the mouse becomes very easy. Then whatever is to be done on the computer, this small mouse is needed. But if this mouse suddenly goes bad ..... then it doesn't matter if you can run your mouse pointer from your keyboard for some time. Let our know-how -


How to activate mouse keys-------

Activating the mouse key is very easy, there are two ways -

First, if your mouse is bad, just press Alt + Shift + Num Lock all three buttons at once from the keyboard.

And second, if your mouse is correct and you want to test with it, then open the Control Panel, open the Ease of Access Center or Accessibility Options, click on Make the mouse easier to use, control the mouse with the keyboard Go and check the turn on mouse key and click Apply.


Mouse keys keyboard shortcut

Now the mouse has been activated, but how to play it, then you use these keyboard shortcuts to run it, it has to be used with the numeric keypad of your keyboard, so while using the shortcut, use the numeric keypad of your keyboard Pay attention to the keypad -


How to click a file using mouse keys
You can click on any file and press the 5 Number Key from the numeric keypad of the keyboard.
How to right-click with mouse keys
To left-click, press the Minus sign (-) from the numeric keypad of the keyboard.

How to left-click and double click a file with mouse keys
 To right-click and double-click, press the plus sign (+) from the numeric keypad of the keyboard.
How to drag mouse pointer with keyboard
You can press the 9, 8, 7, 6, 4, 3, 2, 1 button of the keyboard's numeric keypad to drag the mouse pointer. After a little practice, you can run it with great ease.

How to turn off / disable mouse keys windows

To turn the mouse key off, just press Alt + Shift + Num Lock all the three buttons together again from the keyboard.


Tag - how to use the keyboard without a mouse, control mouse with keyboard, mouse keys shortcut, control mouse with the keyboard without Numpad, how to use the keyboard instead of the mouse, use the keyboard as mouse windows 10, mouse keys Runescape, mouse keys not working

Friday, 29 May 2020

How to activate Windows 10

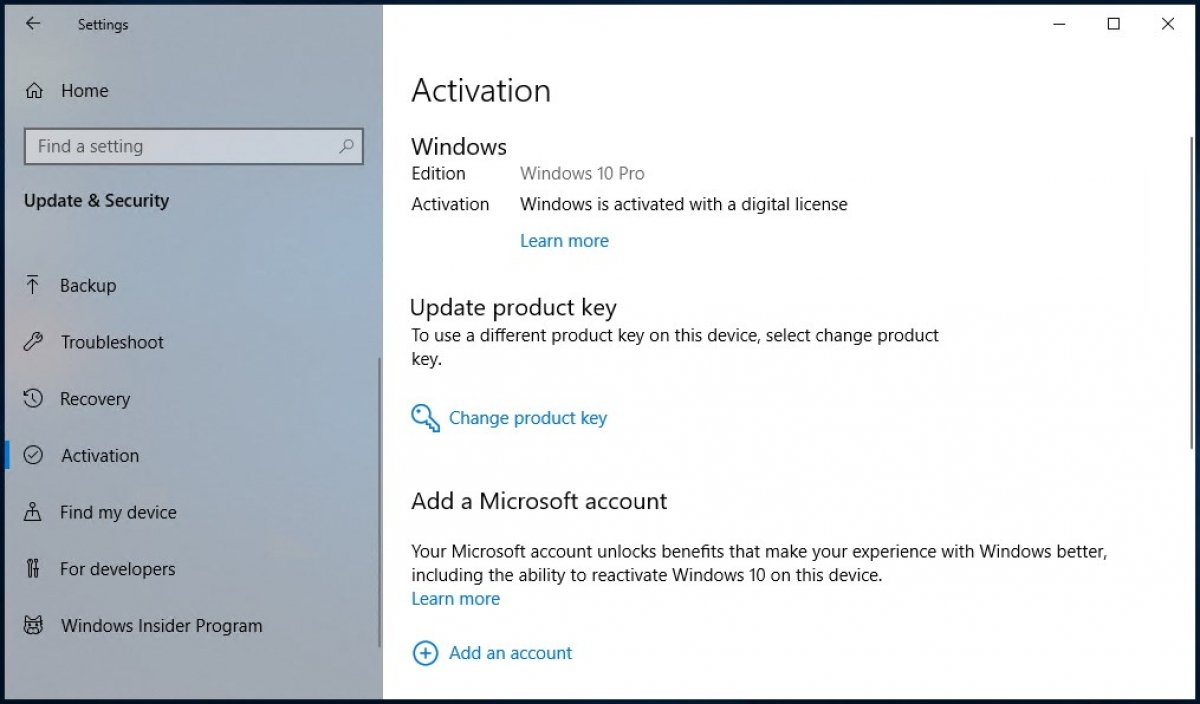
In order to use Windows 10 in a totally legitimate way, it is necessary to activate the system, this means to validate your copy. We show you what you need to validate your copy and how you can do it through the settings
How to activate Windows 10
To activate Windows 10, you need to have a digital license or a product key, only by having one you can activate your copy and guarantee that it is being used according to the software license terms established by Microsoft. You will have one or the other depending on how you obtained Windows 10.
A digital license is a code directly connected to your Microsoft account. You do not need to perform an action on the computer, just log in and connect your PC to the Internet, the activation will be done automatically. Windows digital licenses are purchased from the official Microsoft store. There, you will find the Home version and the Pro version. Once the purchase has been made, you will receive the necessary data in your Microsoft email account.
Computers that come with Windows 10 pre-installed also use this type of license. In these cases, you can extract the code from the operating system itself in case you need it in the future. It is also the type of license you get when you upgrade a legal version of Windows 7 or Windows 8 using the free upgrade system implemented by Microsoft since the release of Windows 10.
The product key is a numeric code of 25 characters, separated by dashes in blocks of 5 characters. This is the code you get when you buy the operating system from an authorized dealer or distributor, for example.
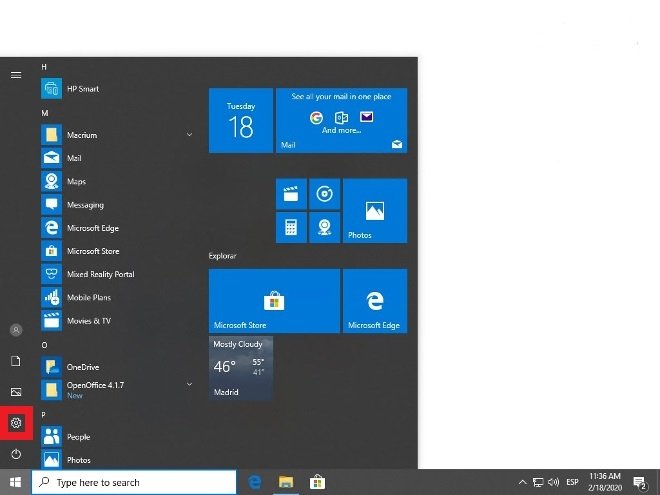
Whether you have a digital license or a product key to activate your version of Windows 10, access your Windows settings. You can do this through the gear icon on the home menu.
Access the Windows 10 configurationAccess the Windows 10 configuration
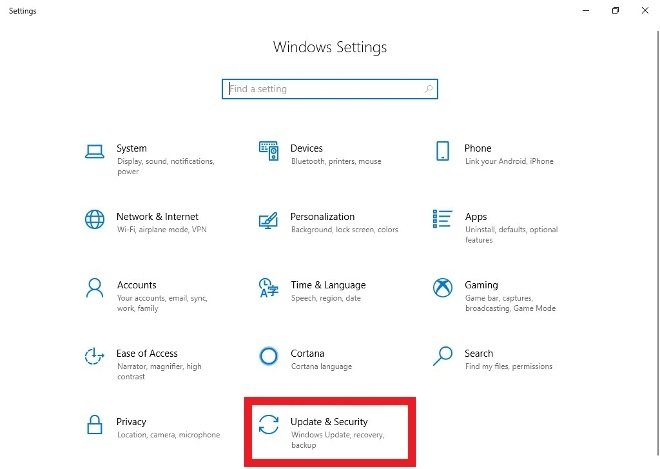
Search through all Update & Security options.
Press Update & SecurityPress Update & Security
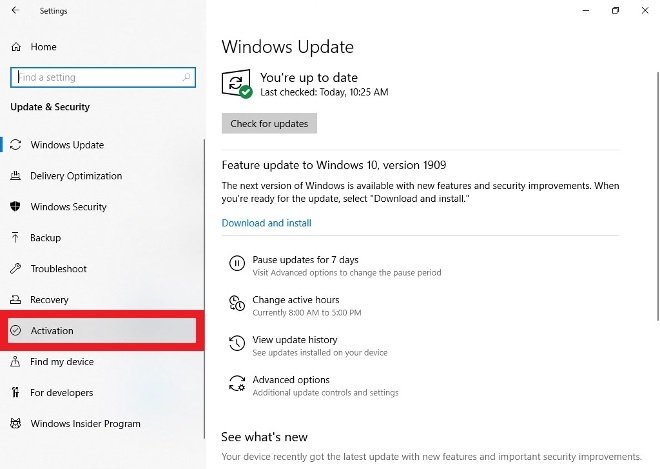
In the menu on the left, select the Activation option.
Go to the Activation sectionGo to the Activation section
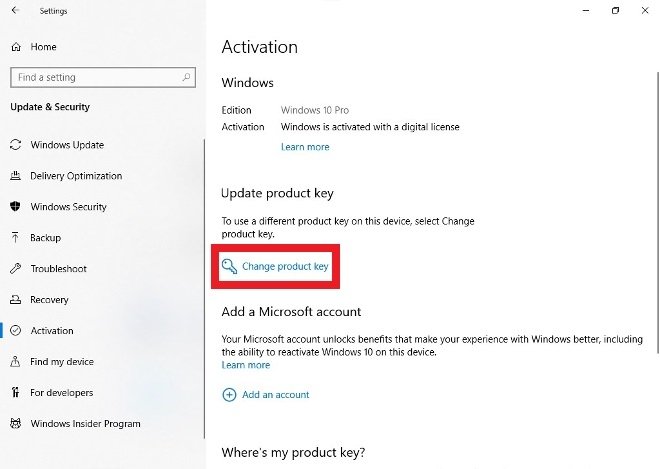
Among all the options, select Change product key.
Press Change Product KeyPress Change Product Key
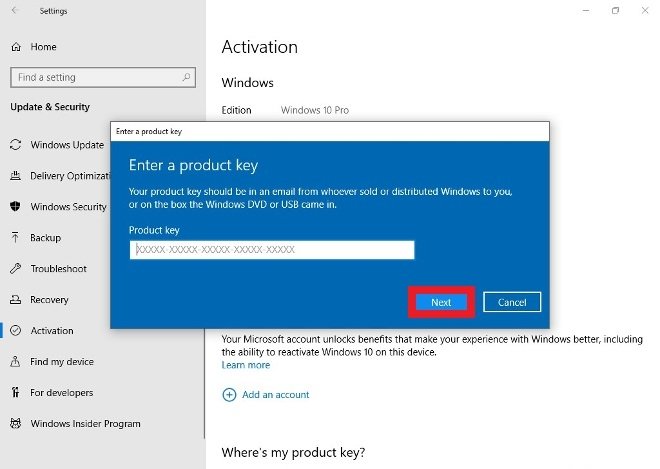
Enter the product key in the text box and tap Next. At that moment, your version of Windows 10 should be activated.
Type in the license number and press NextType in the license number and press Next
It is possible to use Windows 10 without activating it. In that case, there are some limitations: you will always see a watermark on the screen that warns you that you are using an unactivated version and you will not be able to customize the wallpaper, the colors or the lock screen.

How to disable Cortana in Windows 10

You do not like Cortana and the features it offers? We will show you how you can disable Microsoft's Virtual Voice Assistant to ensure that there is no trace of it on your operating system
How to disable Cortana in Windows 10
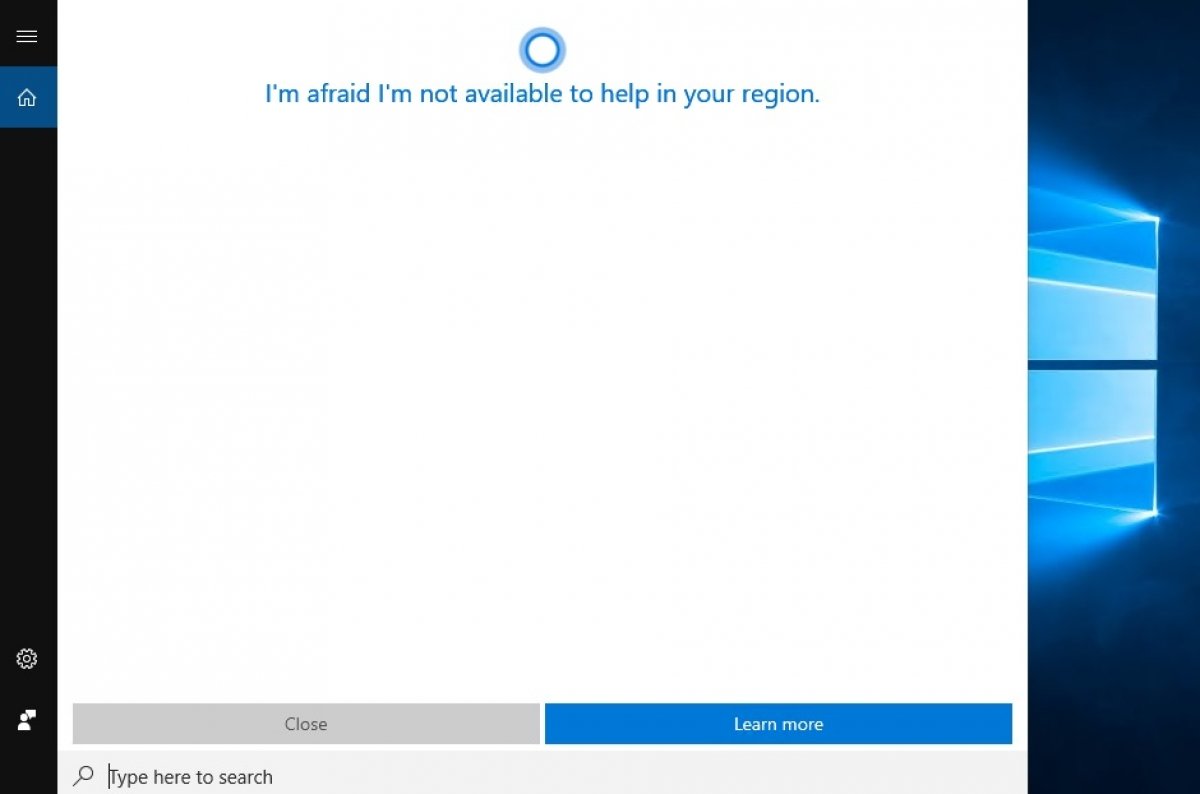
Cortana is the voice assistant for Windows 10, but you might not want to use it for different reasons. In that case, it is possible to disable its functions through the Windows registry.
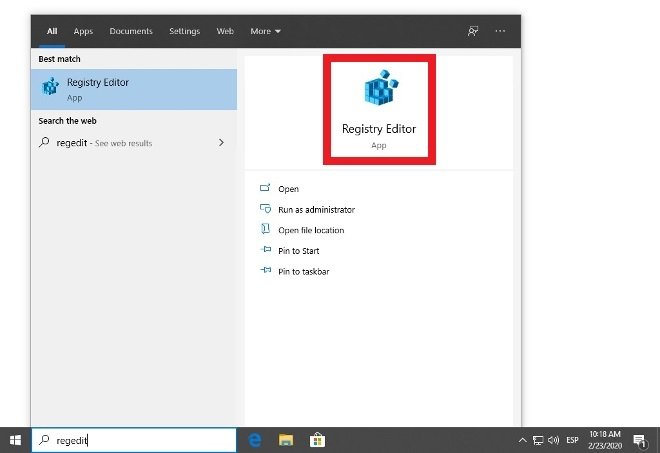
Click the Start button on your Windows menu and type in regedit. Select the first option in the search results:
Access to the registry editorAccess to the registry editor
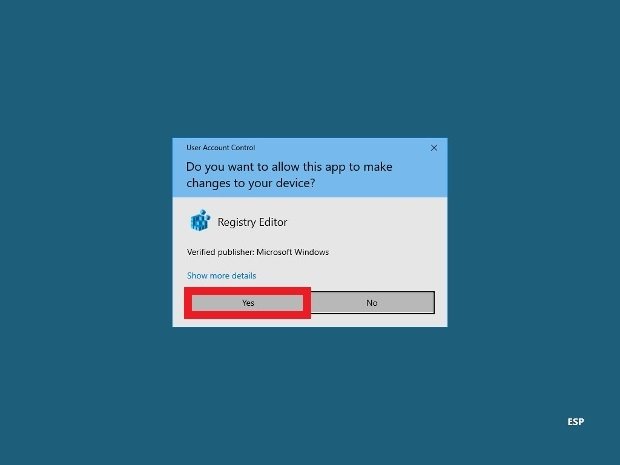
If you are asked for administrator permissions, grant them so you can make changes to the system.
Give the software permissions to make changesGive the software permissions to make changes
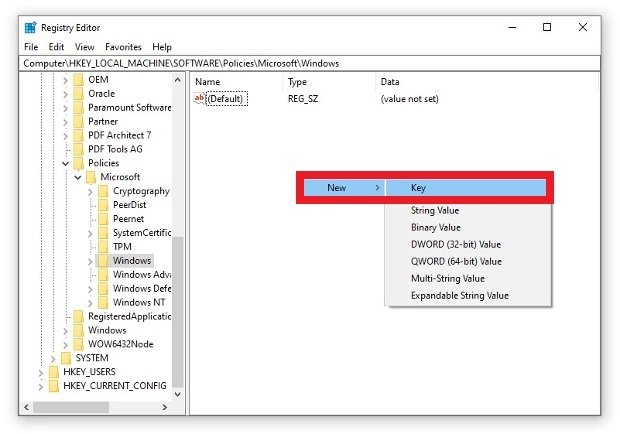
Browse to the route HKEYLOCALMACHINE\\SOFTWARE\\Policies\\Microsoft\\Windows. Once there, click with the mouse right button on the blank right space and select New>Key to create a new folder.
Creation of a new folder in the registryCreation of a new folder in the registry
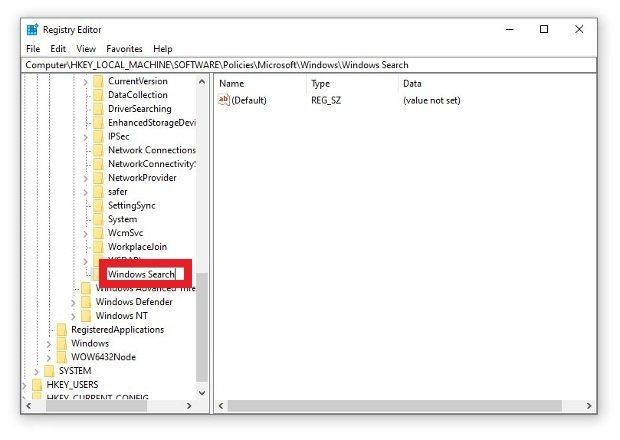
A new subfolder will be created in the folder tree in the left menu and you can name it. Be sure to name it Windows Search.
Creation of the Windows Search folderCreation of the Windows Search folder
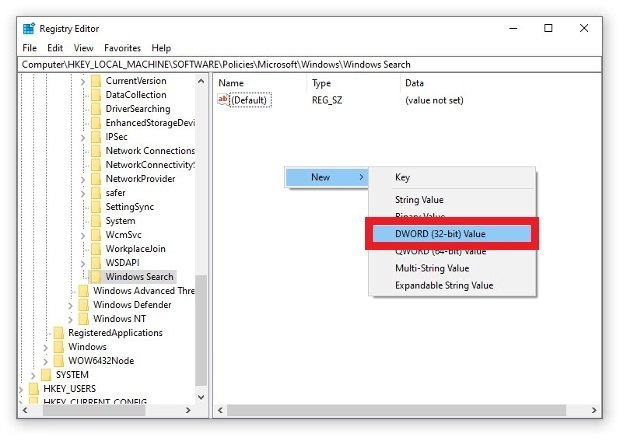
Click on the new folder and in the white space on the right side, right-click and select New>DWORD (32-bit).
Creation of a new DWORD entryCreation of a new DWORD entry
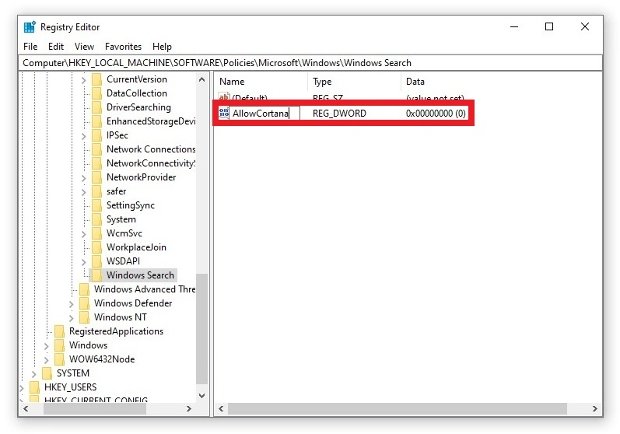
Set AllowCortana as the name.
The new registry must be called AllowCortanaThe new registry must be called AllowCortana
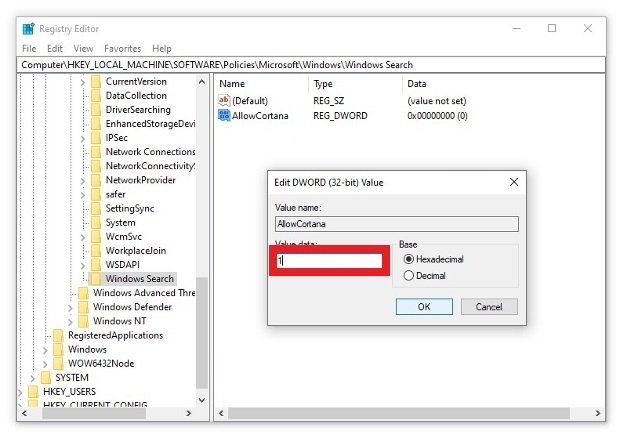
Finally, double click on that new file to edit its values. Make sure you set the Value Data field to 0 and press Ok.
Edit the values of AllowCortanaEdit the values of AllowCortana
After rebooting Windows 10, Cortana will have completely disappeared from the system and you no longer have to worry about it. If you want to revert the change at any time, just follow these same steps in reverse and set the value to 1, it will return Cortana and all its functions to your screen.

How to unzip password-protected ZIP files

Extracting a password-protected ZIP using Windows 10


Using Windows' integrated file compression and decompression tool, it is possible to open password-protected ZIP files. First, search for the file on your PC and double-click it. That should let you see its contents.
Issues may occur when opening the ZIP files or extracting them to a new folder on your computer. In both cases, Windows will display a pop-up window warning that the files are password protected. Type the password in the Password text box and press Ok on the right side.

Extracting password-protected ZIP files using WinRAR

WinRAR is a popular file compression and decompression software that supports password-protected ZIP files. First, you must make sure you have the software installed on your PC. If it is not installed, download the executable from the green Download button below.
Once you have the software installed and ready to use, find the password-protected ZIP file you want to open. Now, you have two different options to open it. With a double click, you can see the content of the file as you would with the system's integrated tool.
When you try to open a specific file or move it to another directory on your hard drive, you will be asked for the password. Type the password in the text box and click Ok at the bottom of the window.
Your second option is to use the context menu options. When you install WinRAR and if you do not specify otherwise, its options will be added to the Windows context menu. Find the file, right-click it, and select the option you are interested in.
Depending on the option chosen, you will be able to see the content as in the previous case or the same window will appear directly for you to enter your password. Do it, click on the Ok button and you will be able to work with the files inside without any problem.

How to protect a folder with a password on Windows 10

There is no native Windows 10 method of password-protecting folders, but there is a little trick to creating a password-protected folder. It is not the most intuitive process in the world, but it can help us at a particular moment.
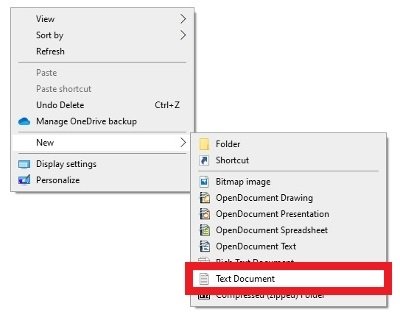
Create a text file with the name you want in the same directory where you will place the protected folder. For example Protected Folder. Right-click on a blank space on your desktop and select New> Text Document.

Creation of a TXT document on the desktopCreation 
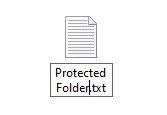
Now, rename the file as Protected Folder.
Creation of a TXTCreation of a TXT
Open the document and paste the following code:
cls
@ECHO OFF
title Folder Locker
if EXIST "Control Panel.{21EC2020-3AEA-1069-A2DD-08002B30309D}" goto UNLOCK
if NOT EXIST Locker goto MDLOCKER
:CONFIRM
echo Are you sure u want to Lock the folder(Y/N)
set/p "cho=>"
if %cho%==Y goto LOCK
if %cho%==y goto LOCK
if %cho%==n goto END
if %cho%==N goto END
echo Invalid choice.
goto CONFIRM
:LOCK
ren Locker "Control Panel.{21EC2020-3AEA-1069-A2DD-08002B30309D}"
attrib +h +s "Control Panel.{21EC2020-3AEA-1069-A2DD-08002B30309D}"
echo Folder locked
goto End
:UNLOCK
echo Enter password to Unlock folder
set/p "pass=>"
if NOT %pass%==INPUT YOUR PASSWORD HERE goto FAIL
attrib -h -s "Control Panel.{21EC2020-3AEA-1069-A2DD-08002B30309D}"
ren "Control Panel.{21EC2020-3AEA-1069-A2DD-08002B30309D}" Locker
echo Folder Unlocked successfully
goto End
:FAIL
echo Invalid password
goto end
:MDLOCKER
md Locker
echo Locker created successfully
goto End
:End
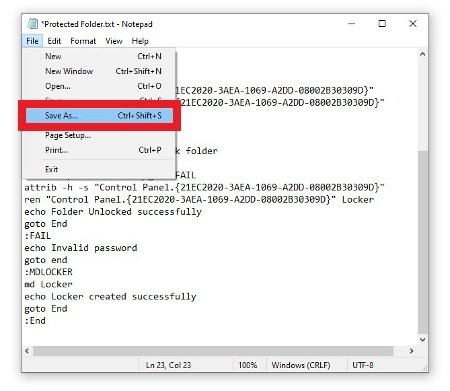
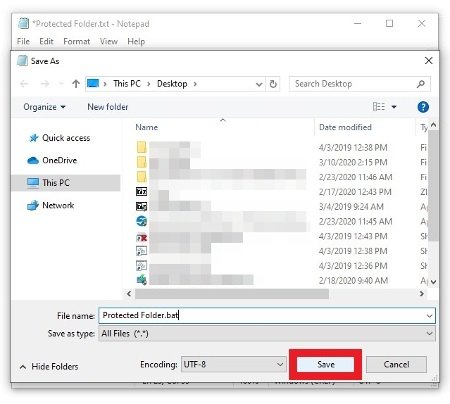
Substitute in the text INPUT YOUR PASSWORD HERE with the password that you want to protect the folder with. Once done, save the text file with the extension .bat. To do this, go to the menu File>Save As...
Option to save the TXT createdOption to save the TXT created
Make sure the file extension is .bat and select the file type All files. When you are done, press Save in the lower right corner.
Save the doc as a BAT fileSave the doc as a BAT file
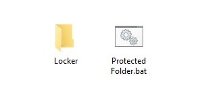
You have just created the app that will let you generate and hide your new password-protected folder. Double-clicking on this BAT file will create an automatic folder for you to save all your files in.
New protected folder already createdNewly protected folder already created
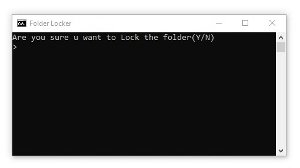
Once you have saved everything you need in it, double-click on the BAT file again. A window will open on the Windows screen asking if you want to hide the protected folder. Type Y as a synonym for Yes to do so, or N if the answer is no.
Confirmation window to hide the folderConfirmation window to hide the folder
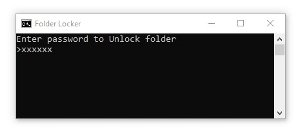
When you confirm the operation, the folder will disappear from your sight. When you need it back, just press the BAT file twice again. That will open a new window where you will have to type the key and press Enter to make the folder visible again.
Enter the password to open the folderEnter the password to open the folder
Note that this will only work if you have the option to not show hidden folders enabled in Windows 10. But if these folders are visible, your protected folder will also be visible and all these steps will be useless.

Wednesday, 27 May 2020

How to Create Folder Without Name in Windows 10

you will learn how to create a folder in Windows Without or No Names.
If your friends don't already know about this trick, then they will really get amazed at how you did this?
This trick applies to Windows XP / Vista / 7 / Windows 8, 8.1 & Windows 10. In Windows XP, if ALT+0160 doesn't work then you can press the ALT+0255 key combination.

How to Create a CON Folder

1. Using the Command Prompt:

Here is a step-by-step procedure to create the “con” folder using the command prompt:
  1. Go to the command prompt:
  2. Type in the command prompt (For ex. To create a folder in the E: drive by name: “CON”)
     C:\>md \\.\e:\con 
  3. In case if you wish to delete the folder, use the following command:
     C:\>rd \\.\e:\con 
NOTE: This folder can only be deleted from the command prompt. You cannot remove it by right-click delete.


General PC Tips

  Adjust any setting on your PC with the Windows “God Mode” folder, which is a centralized Control Panel for all the OS settings. Access thi...